
1-Classic Birthday Cake Recipe: 5 Essentials
Hey there! 🎉 If you’re looking to bake a classic birthday cake that’s sure to impress, you’ve landed in the right spot. After all, what’s a birthday without that fluffy slice of happiness? In this guide, I’m going to break down the five essentials you need to create an unforgettable Classic Birthday Cake recipe. Whether you’re a novice baker or a kitchen whiz, these tips will have you making cakes that taste as good as they look. So let’s dive in!

1. The Right Ingredients Make All the Difference
First things first, let’s talk ingredients. To nail that Classic Birthday Cake recipe, you’ll want to gather the basics. Here’s what you need:
- All-purpose flour: Gives your cake structure.
- Granulated sugar: Because who doesn’t love a little sweetness?
- Butter: Use unsalted butter for that rich flavor.
- Eggs: They add moisture and help bind things together.
- Baking powder: The secret ingredient for that fluffy texture.
- Milk: A splash for smoothness; feel free to go for whole or buttermilk!
Pro Tip: Always measure your ingredients accurately. Baking is like chemistry in the kitchen, and a little miscalculation can throw everything off balance.
2. Mastering the Mixing Technique
Now that you have your ingredients, it’s time to mix! The way you combine your ingredients can make or break your cake. Here’s a step-by-step for the mixing process:
- Cream the Butter and Sugar: Start by beating the butter and sugar together until they’re light and fluffy. This step is crucial for incorporating air, which makes your cake rise.
- Add Eggs Gradually: One at a time, mix in your eggs. This helps prevent curdling and results in a smoother batter.
- Blend in Dry Ingredients: In a separate bowl, whisk together your flour and baking powder. Gradually add this to your wet mix, alternating with the milk, starting and ending with the flour.
- Don’t Overmix: Once combined, stop mixing! Overmixing can lead to a dense cake instead of a light and airy one.
Fun Fact: Did you know that the air you whip into the batter is what helps your cake rise in the oven? It’s like giving your cake a little hug!
3. Choosing the Right Baking Pans

Let’s not forget about the pans! The type and size of the baking pans you use can impact your cake’s texture and cooking time. Here’s a quick guide:
- Standard Round Pans: Perfect for a classic layered cake; usually 9 inches works best.
- Wilton Cake Pans: Great for even baking and shaping.
- Grease & Flour: Always grease and flour your pans (or use parchment paper) to ensure your cake comes out smoothly.
Baking Tip: Make sure your oven is preheated to around 350°F (175°C) before you pop in your cake. This helps in achieving that perfect rise and golden color.
4. Adding Personal Flavor (and Frosting!)
While a classic birthday cake is delightful on its own, adding a personal touch can elevate it even more! Here are some ideas:
- Flavor Variations: Want a chocolate twist? Swap some of the flour for cocoa powder! Or for a refreshing zing, add a touch of lemon zest.
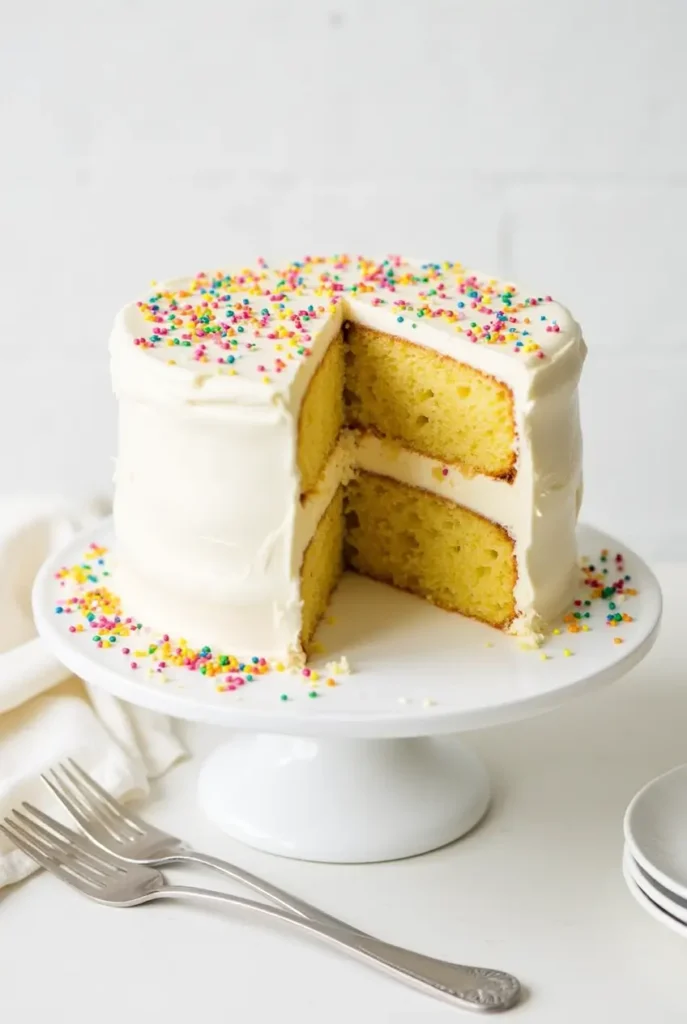
- Frosting: A classic buttercream frosting is always a hit. Mix butter, powdered sugar, and a splash of vanilla together until smooth. Feel free to get creative with colors and decorations.
- Decorations: From sprinkles to fresh fruits or even edible flowers, get creative! You might even tell a story with your cake decorations.
Anecdote: I remember the first time I tried to decorate a cake—I ended up with more frosting on my face than on the cake! But hey, it was all part of the fun.
5. The Grand Finale: Tips for Serving and Storing
You’ve baked your beauty, now how do you serve it? Here’s a quick guide to make that moment extra special:
- Serving: Cut your cake into slices but try to leave it whole for as long as possible. It’s like a surprise waiting to be unveiled!
- Storing: If you have leftovers (which is a big if, right?), store them in an airtight container at room temperature for up to three days, or in the fridge for about a week.
- Reheating: If you want a slice that’s warm and cozy, pop it in the microwave for a few seconds.
Final Tip: Don’t forget the candles! Because what’s a birthday without a little bit of flame and cheer? So there you have it! With these five essentials, you’re ready to take on the kitchen and whip up a Classic Birthday Cake recipe that not only tastes amazing but looks like a million bucks.
2-Classic Birthday Cake Recipe: 5 Essentials
Welcome back! 🎂 We’re diving deeper into the world of baking with our focus on the Classic Birthday Cake recipe. In our first section, we went over the foundational essentials. Now, let’s explore some more detailed steps to help you master this beloved dessert. From understanding the nuances of ingredients to practical baking tips, I’ve got you covered. So, roll up your sleeves and let’s get started!

1. The Heart of the Cake: Ingredients
When it comes to baking, the ingredients are the stars of the show, and for a Classic Birthday Cake recipe, they play a crucial role. Here’s a list of must-have ingredients and why they matter:
- All-Purpose Flour: This is your primary building block. It provides the structure that makes your cake rise beautifully.
- Granulated Sugar: This not only sweetens your cake but also contributes to its moistness. It’s essential for that melt-in-your-mouth texture!
- Unsalted Butter: I always prefer unsalted butter for baking. It gives you control over the saltiness, plus it adds a rich, creamy flavor.
- Eggs: These little wonders bind the ingredients together and add moisture and richness.
- Baking Powder: This is your leavening agent. It’s what makes your cake fluffy and light, so don’t skip this!
- Milk: A bit of milk rounds out the batter and enhances the flavor.
Pro Tip: Use room temperature ingredients! It makes everything blend easier and creates a smoother batter.
2. Perfecting Your Mixing Technique
Now that we have our ingredients ready, let’s focus on mixing them. Trust me, the mixing technique can truly elevate your Classic Birthday Cake recipe. Here’s how to do it right:
- Start with the Butter and Sugar: In a mixing bowl, cream together the butter and sugar until it’s light and fluffy. This step is essential – it infuses air into the batter, giving you that nice rise.
- Add the Eggs One by One: It’s tempting to crack them all in at once, but adding them individually allows better incorporation.
- Combine Wet and Dry Ingredients: In a separate bowl, whisk together your flour and baking powder. Gradually mix this into your butter mixture, alternating with the milk. This method prevents the batter from getting lumpy.
- Mix Just Until Combined: Overmixing can lead to a dense cake, and nobody wants that! Stop mixing as soon as you don’t see any dry flour.
Anecdote: I remember the first cake I made, I overmixed terribly. The cake came out like a brick! It’s a lesson I’ll never forget.
3. Choosing the Right Baking Pans

The right pans can make a world of difference in how your cake turns out. If you’re using the Classic Birthday Cake recipe, here’s a quick guide:
- Round Cake Pans: Standard 9-inch round pans are ideal for a classic layered cake. They ensure even baking and a nice shape.
- Square Pans: If you’re feeling adventurous, square pans can be fun, too! Just adjust your baking time accordingly.
- Pans to Avoid: Steer clear of dark pans, as they absorb heat and can cause your cake to overbake.
Baking Tip: Line your pans with parchment paper for easy removal. Just cut out a circle for the bottom, and you’ll have less of a mess to deal with!
4. Baking and Cooling for Success
As you approach the baking phase, keep this in mind:
- Preheat Your Oven: Always preheat to 350°F (175°C). This ensures your cake starts baking right away, which is crucial for proper rising.
- Bake for 25-30 Minutes: Check for doneness by inserting a toothpick in the center. If it comes out clean, you’re good to go!
- Cooling: Let your cakes cool in the pans for about 10 minutes, then transfer them to a wire rack. Allowing them to cool completely before frosting is essential to avoid a melty disaster.
5. Personal Touch: Frosting and Decorating Your Cake
Now for the fun part—decorating! The frosting can turn your Classic Birthday Cake recipe into a work of art. Here are some essentials:
- Classic Buttercream Frosting: Mix butter and powdered sugar with a splash of vanilla extract. This creates a creamy, delicious topping.
- Add Colors: If you’re feeling trendy, add food coloring to your frosting. Swirls of color can make your cake pop!
- Decorate with Love: Use fresh fruit, sprinkles, or even edible flowers to give your cake that extra charm. Don’t be afraid to get creative!
Final Touch: Remember the candles! They’re essential for that birthday magic. Plus, who doesn’t love making a wish? And there you have it! By following these steps, you’re on your way to creating a Classic Birthday Cake recipe that not only looks great but tastes fantastic too.
3-Classic Birthday Cake Recipe: 5 Essentials
Welcome back to the sweet world of baking! 🎉 In our previous sections, we talked about the essentials of creating a Classic Birthday Cake recipe and how to perfect your mixing techniques. Now it’s time to wrap everything up with practical insights on customizing and decorating your cake. After all, what’s better than putting your own spin on this timeless classic? Let’s get those creative juices flowing!
1. Flavor Variations That Wow
While the classic vanilla flavor is always a crowd-pleaser, why not jazz things up a little? Here are some flavor variations that will transform your Classic Birthday Cake recipe into something sensational:
- Chocolate Delight: Simply replace some of the flour with cocoa powder. You can even use chocolate frosting for an extra indulgence. Treat yourself!
- Lemon Zest: Add a teaspoon of lemon zest to the batter for a refreshing twist. It adds brightness and pairs beautifully with a lemon buttercream.
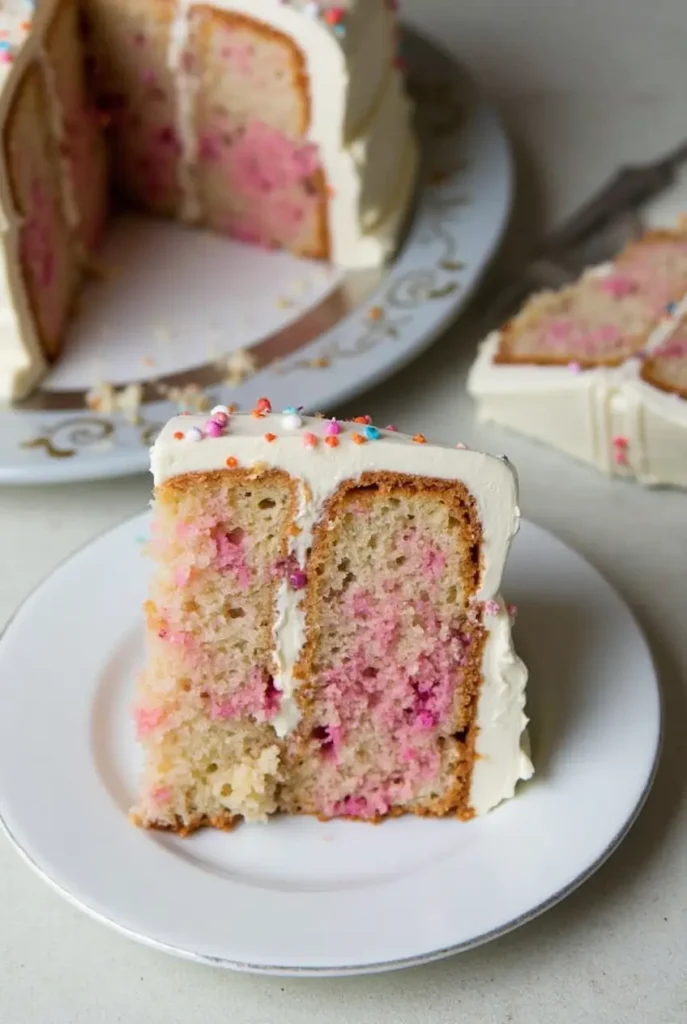
- Funfetti: Toss in some rainbow sprinkles right before you finish mixing. This adds a festive touch and is sure to delight kids and adults alike!
- Almond Extract: Swap out vanilla for almond extract. It gives a unique flavor that’s rich and aromatic. Trust me; you’ll never go back!
Personal Insight: I love experimenting with flavors. One year, I made a spiced chai birthday cake, and it was a total hit! The warm spices added a cozy, unique touch.
2. Frosting that Steals the Show
Now, let’s chat about frosting! The right frosting can elevate your Classic Birthday Cake recipe to a whole new level. Here are some popular options and tips:
- Buttercream Frosting: This classic frosting is easy to make and oh-so-delicious. Just beat butter, powdered sugar, and a splash of milk until fluffy. Add vanilla or any flavor extract you love!
- Cream Cheese Frosting: Perfect for those who enjoy a tangy twist. It pairs beautifully with carrot or red velvet cakes, but it works wonders on vanilla cakes too.
- Whipped Cream: Light and airy, whipped cream is a great choice if you want something less sweet. Just whip heavy cream with a bit of sugar until soft peaks form—easy peasy!
Witty Insight: Remember, frosting is like the icing on the cake—literally! So don’t be shy; pile it on! Your cake deserves a little love.
3. Creative Decorating Ideas
Now onto the fun part—decorating your cake! A beautifully decorated cake can be the centerpiece of any birthday celebration. Here are some creative ideas to get those wheels turning:
- Naked Cake Style: Leave some of the cake exposed for a rustic look. Just use a thin layer of frosting on the sides, and let the delicious layers show.
- Piping Techniques: Invest in a few piping bags and tips. You can create beautiful borders, rosettes, or fun patterns with just a little practice.
- Fresh Fruit and Edibles: Top your cake with fresh berries, slices of citrus, or edible flowers for a fresh and trendy look. It’s amazing how a few well-placed strawberries can brighten up your cake!
- Sprinkles and Chocolate Shavings: Who doesn’t love sprinkles? They add color and fun. Chocolate shavings or curls add a touch of elegance to your creation.
Anecdote: I once went a bit overboard with the sprinkles and ended up with a colorful explosion! As messy as it was, it made for the best birthday memories.
4. Layering Techniques for the Perfect Slice
If you’re going for multiple layers, let’s ensure those layers are stacked perfectly. Here’s how:
- Leveling Your Cake: Once your cake layers are cooled, use a serrated knife to level the tops. This ensures they stack neatly and look professional.
- Filling Options: Between layers, you can add a variety of fillings like fruit preserves, custards, or flavored frostings. Get creative and mix textures!
- Stacking: Use a cake board or a plate to transfer layers easily. If you’re feeling ambitious, use dowels to support taller cakes, especially if you’re stacking more than two layers.
Pro Tip: Always allow your cake to settle for a bit after stacking. It helps keep everything in place and prevents any sliding.
5. The Final Touch: Serving Your Masterpiece
Once your cake is decorated, it’s time to serve it up! Here’s how to make this moment memorable:
- Presentation Matters: Place your cake on a beautiful cake stand. It adds elegance and height to your dessert table.
- Slice with Care: Use a sharp knife to cut even slices. Wipe the knife between cuts for clean lines. Everyone loves a neat piece of cake!
- Add Candles: Don’t forget the candles! They bring a wonderful sense of celebration and joy. Plus, it’s a tradition!
Anecdote: I remember lighting the candles and realizing I had bought the wrong number. So there I was, trying to balance eight candles on a cake meant for six. The laughter that followed made it all worth it! And there you have it! With these tips, your Classic Birthday Cake recipe will not only taste amazing but also look incredible. Remember, baking is a celebration of joy, creativity, and delicious moments.
4-Classic Birthday Cake Recipe: 5 Essentials
Welcome back, cake enthusiasts! 🎉 We’ve come a long way in our journey to mastering the Classic Birthday Cake recipe. So far, we’ve covered the ingredients, mixing techniques, customization options, and decorating tips. But you know what? Sometimes things don’t always go as planned. That’s why in this section, we’re tackling common issues you might face when baking your cake and how to troubleshoot them. Let’s ensure your cake is celebration-ready without any hiccups!
1. Common Baking Mistakes and How to Avoid Them
Baking is a science, but even the best bakers face a few mishaps now and then. Here are some common mistakes that could pop up when making your Classic Birthday Cake recipe, along with tips on how to avoid them:
- Cake is Too Dense: If your cake comes out heavy, it might be due to overmixing the batter. Remember to mix just until combined. It’s like trying to whip cream; overdoing it can lead to disaster!
- Cake Won’t Rise: If your cake is flatter than expected, check the freshness of your baking powder. Old baking powder can lead to sad, flat cakes. Always test it by adding a teaspoon to hot water—if it bubbles, you’re good to go!
- Burnt Edges: This typically happens when your oven is too hot. Always double-check the temperature with an oven thermometer, because your oven might be playing tricks on you.
- Dry Cake: A dry cake can happen if you overbake it. Set a timer and start checking for doneness a few minutes early. You want that toothpick to come out with a few moist crumbs, not completely clean!
- Uneven Layers: If your cake layers aren’t level, use a serrated knife to trim them after baking. It’s a simple fix that can make a huge difference in presentation.
Witty Insight: Think of baking like a first date—nerves can ruin the experience! Stay calm, follow the steps, and don’t skip the important ones.
2. How to Fix Common Cake Problems
Sometimes, despite our best efforts, things can go awry. Here’s how to troubleshoot some common cake problems if they do arise:
- If Your Cake Falls: This can be devastating, but don’t panic! If the top is still somewhat intact, slice it off and serve it as a “deconstructed” cake. Add whipped cream and fruit, and it’s like a fancy dessert!
- Frosting Melts: If your frosting is sliding off like it’s on a water slide, try chilling the cake for a bit before frosting it. A cold cake holds frosting better, making it easier to work with.
- Cracked Tops: This can happen if your oven temperature is too high. If your cake cracks, don’t worry—simply frost the top heavily. A little frosting can hide a multitude of sins!
Anecdote: I once made a cake that cracked down the middle. Instead of panicking, I turned it into a “layered surprise” cake with whipped cream and berries. Sometimes, a mistake can turn into a delightful treat!
3. Advanced Tips for Baking Perfection
If you want to step up your baking game, here are some advanced tips to help you achieve the perfect Classic Birthday Cake recipe:
- Use Room Temperature Ingredients: Before you start mixing, take your eggs and butter out of the fridge. Room temperature ingredients blend more smoothly and create a fluffier cake.
- Cake Strips: Invest in cake strips, which are fabric strips soaked in water. Wrap them around your cake pans before baking for even heating. This reduces doming and results in flat cakes.
- Oven Placement: Place your cake in the center of the oven for even baking. If you bake multiple layers at once, ensure they are spaced apart for proper air circulation.
- Experiment with Flours: If you want a finer texture, consider using cake flour instead of all-purpose flour. It has a lower protein content, which can give you that light and tender crumb.
- Chill Frosting: For a smooth application, chill your frosting before spreading it on the cake. It firms up slightly and makes it easier to work with, leading to cleaner lines and swirls.
Pro Tip: The best bakers know that practice makes perfect. Don’t get discouraged by little setbacks. Every cake is a learning experience!
4. Questions You Might Have
As you embark on your baking adventure, you might find yourself wondering about a few things. Here are some frequently asked questions and their answers:
- Can I make this recipe in advance? Absolutely! You can bake the cake layers a day ahead. Just wrap them in plastic wrap and store them at room temperature.
- How long can I store leftover cake? If stored properly in an airtight container, your cake can last about 3 days at room temperature or up to a week in the fridge.
- Can I freeze my cake? Yes! You can freeze unfrosted cake layers for up to three months. Just make sure they’re well-wrapped. You can frost them when you’re ready to serve.
- What if I want to make it gluten-free? You can substitute all-purpose flour with a gluten-free baking blend. Just check the package for any specific recommendations.
5. Making It Your Own
At the end of the day, the beauty of creating a Classic Birthday Cake recipe is making it uniquely yours. Don’t be afraid to put your spin on things, whether it’s with flavors, decorations, or even how you serve it. Baking is as much about creativity as it is about technique, so let your personality shine through! And there we have it! With these troubleshooting tips, advanced techniques, and answers to your burning questions, you’re fully equipped to tackle your Classic Birthday Cake recipe challenges.
FAQ
Q: Can I use different flavors in my classic birthday cake?
A: Absolutely! Don’t hesitate to swap out vanilla for chocolate, lemon, or even almond extract to create a unique twist on the classic.
Q: How can I make my cake moist?
A: Using quality ingredients, measuring accurately, and not overmixing your batter will help keep your cake moist. Also, consider soaking the layers with simple syrup before frosting!
Q: Can I make the cake ahead of time?
A: Yes! You can bake the layers a day in advance and store them covered at room temperature. This allows for easier decorating when you’re ready.
Q: What’s the best way to store leftover cake?
A: Store leftover cake in an airtight container at room temperature for up to three days or refrigerate it for about a week. For longer storage, consider freezing the cake.
Q: Can I use gluten-free flour?
A: Yes! You can substitute regular flour with a gluten-free baking mix. Just check the package instructions for best results.